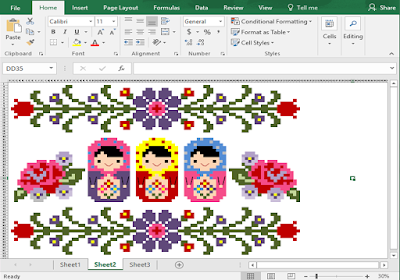
Example of a Microsoft Excel created cross stitch design.
Remember to zoom in and out (bottom right hand corner sliding bar) to see your design up close
and to tell if your design is believable from a distance.
Remember to zoom in and out (bottom right hand corner sliding bar) to see your design up close
and to tell if your design is believable from a distance.
This photo is a screenshot of a design at 30% of its real size.


***If you go too far in either direction you can move your mouse back and forth while still 'clicking' until you get exactly the size you want.


Step 3: Click into a cell. This will allow you to change each cell to represent a stitch without changing every stitch simultaneously. Save your document.
Colors or Symbols

- I change the color of the cells (stitch) by choosing a different background color for the cell.
- This can be found under the Home tab, under the Font box, and clicking on the arrow next to the Pouring Paint Can. Select a color you like by clicking on it or click Show more colors, selecting a color, and clicking ok.
- If you want to color multiple cells the same color you can select them all and click the color next to the Pouring Paint Can (it is yellow in the picture above); OR after clicking on the color next to the Pouring Paint Can when the black box (where you are able to type/what cell you are in) matches the first stitch of the color you want you can use the arrow keys to reach the next cell (or click on the cell) and hit the F4 key (this will repeat the last action you did in Excel-sadly if that was hitting the Undo button it will not color your background but will Undo your last action, etc.). I find pushing buttons goes a little faster than clicking on each cell I want to color and then clicking on the color square next to the Pouring Paint Can.
- Or you can use symbols:
- I just use the same letter, number, or punctuation mark to represent a final floss color. Usually it's when I want a white or flesh tone cell colored which don't always print out very differently from the white non-pattern cells.
- Sometimes for representing backstitching I add a line or series of lines (like for smiles). (Insert Tab, Shape, Click on the Line, and then click and drag on the Excel sheet where you want it to go).
- To change the color of a line:
- On the Format tab, click the arrow next to Shape Outline, select a color you like or click on Show more colors, selecting a color and clicking ok.
- To add add multiple lines and have them move as one:
- Arrange them how you want them to finally look anywhere on the sheet (like for a smile two diagonal lines and a horizontal line connected); and then click on a line (it will show two white dots on the ends); Hold down the Shift or Ctrl key (not both) and click the other lines you want to add; let go of the Shift or Ctrl key; Right click on one of the selected lines; go down to Group on the menu and click Group. All the lines when selected should have a rectangle around them; click and drag on the sheet to where you want for them to end up. Click on any cell to stop the lines' selection (they won't move).
Printing
By default Microsoft Excel does not print the Grid Lines around each cell -so once you print your design it will appear to be floating in space. Handy to know how your final project will look; but a bit frustrating to stitch from.To change that:
- Click on the Page Layout Tab, and under the Sheet Options Box, Grid Lines, click the box Print so it shows a check mark. Save your document.
**In this tutorial, unless stated otherwise, it is assumed that when you 'click' it is with the left button of your mouse or left side of your keypad.
No comments:
Post a Comment